Relative Geometries & Layout Managers
GLAM relies on relative geometries to set up the spatial relationships of most of its components. There are two calls to set up relative geometries. One is the 4 parameter call which is simplified to work in 2d, the other is a 6 parameter call which takes widget depth into account and is used for 3d widgets.
Since GLAM works in openGL, which is a 3 space environment, widgets can have problems with their depth and layering. A GLAM_LAYER has been created to ease the development process. By ensuring child widgets are at least one GLAM_LAYER above their parent, rendering and selection problems can be avoided.
When a component is added to a container, there are several choices available for how align the child to the parent based on the layout manager that the container uses.
2d Layout
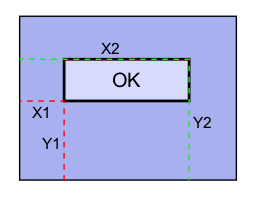
The 2d Layout Manager is often the default layout manager assigned to a container because it is one of the easiest to work with. The relative geometries of the children must be set in order to work with the 2d layout manager. 2d Layout will assign its container children's absolute GL geometries based on the children's spatial relationships to the container's own position and size. The 2d Layout Manager is guarenteed to place all child widgets at least one GLAM_LAYER above the container.
As shown in the figure, X1 and Y1 are the bottom left hand coordinate of the child object relative to the geometry of the parent container. X2 and Y2 are the top right corner of the child object. Using these two points, the 2d Layout Manager is able to calculate and set the absolute GL geometry of the child object based on its own absolute GL position and size.
Flow Layout
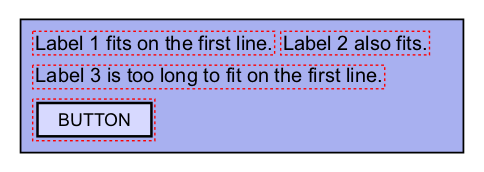
A Flow Layout attemps to align all components horizontally across the parent container's size, moving a component to the next row down only if it has insufficient space left to lay out the child. FlowLayout does NOT need or use the relative geometries of its children to lay them out, it will calculate the layout based on the children's GL Extents. The Flow Layout will place all children at least one GLAM_LAYER above their parent.
The Flow Layout shown above has placed Label 2 after Label 1 on the same line because there was horizontal space left for Label 2 to fit. However, Label 3 was moved to the next line because it was too large for the space that remained after Label 2 was placed. The Button was also moved to the next line after Label 3 because there was no horizontal room for the Button after Label 3.
Grid Layout
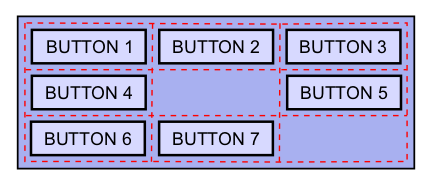
A Grid Layout allows the designer to create a gridwork of space, and add child components to individual cells of space. This allows a more controlled spatial layout than a Flow Layout, while maintaining the organization. Grid Layout will place children at least one GLAM_LAYER above their parent.
The Grid Layout shown above has a 3 by 3 layout. Each of the buttons has been assigned a space to be layed out in.
List Layout
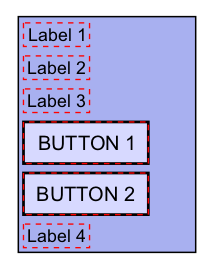
A List Layout will lay the container's children out in a vertical list, one component on each horizontal row. List Layout does NOT require the relative geometries to be set, it will use the GL Extents of the child object to lay it out. List Layout will place all children at least one GLAM_LAYER above their parent.
After the layout manager has been assigned and relative geometries of children widgets have been set, all that is necessary is a call to LayoutInGLArea or LayoutInGLVolume. The LayoutInGLArea is a simplified, 5 parameter version designed to work for 2d widgets. It will reposition and resize the component it is called on, and will recursively set all children widget's GL position and size based on their relative geometry and the layout manager. LayoutInGLVolume is the 6 parameter version used for 3d widgets.
Due to the static size of fonts or the resizability of tables, it is not possible to rely only on relative geometries to handle all sizing and positioning. For instance, we want our fonts to be a consistent size, and the table to be resizeable. The problem appears when you need to know the size of an object in order to lay it out.
GL Extents are the minimum size the widget needs in order to be layed out correctly. Often this is dependent on a widget's text size. For example, the GL Extents of a button with no text could be 0.0, 0.0 because the button would be able to be layed out in no space. However, if it had text in it, the button would report its GL Extents as at least the size of the text in GL units. This is because the minimum size the button can be is now dependent on being able to read the text on the button.
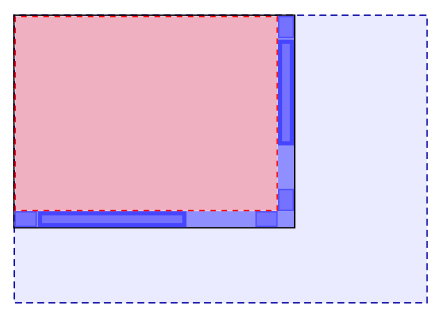
The ScrollablePane uses its own relative geometry to determine the viewport size, and GL Extents of its children to determine the area that will be scrolled.
The Scrollable Pane shown above has three distinct areas. The first is the Black Outlined area, which is the Scrollable Pane's relative geometry. Secondly is the Blue Outlined area, which is the content area that is too big to fit within the bounds of the Scrollable Pane's relative geometry. Lastly we have the Red Outlined area, which is the Scrollable Pane's viewport. This is the area in which the content will be shown. The content area it shows can be changed using the scrollbars on the bottom and right sides.
The Table is a special widget which utilizes GL Extents and the Scrollable Pane to create a dynamically resizeable widget. The Table holds an arbitrary number of Cells, each of which can be resized by dragging the bottom right border corner. Once a Table Cell is resized, or if a new row/column is added, the Table resizes itself and the other cells in that row and column. Since the table itself can grow and shrink, it is necessary to put the table into a Scrollable Pane (outlined above). That way the table will not overlap other widgets in the same container.
